
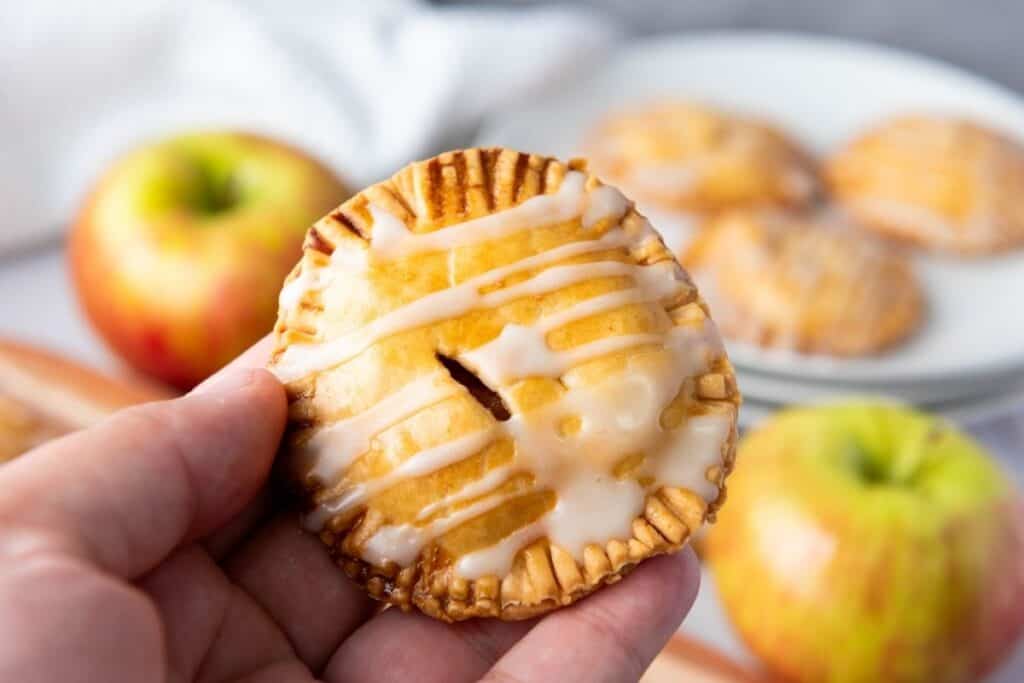
Apple Hand Pies Recipe
These Apple Hand Pies are like portable apple pies you can hold in your hand. They’re crispy on the outside, tender and fruity on the inside, and absolutely irresistible. Using store-bought pie crust makes them surprisingly easy to prepare, and they’re perfect for fall gatherings, lunchboxes, or anytime you’re craving homemade comfort.
This post may contain affiliate link(s). As an Amazon Associate, I earn from qualifying purchases. See Disclosure.
I make these apple hand pies every fall when apples are at their peak, and they disappear almost as fast as I can make them. The combination of tart Granny Smith apples and sweet Honeycrisp creates the perfect balance of flavors, and the cinnamon filling smells absolutely amazing while it cooks.
Using store-bought pie crust is a total game-changer; it cuts the prep time in half without sacrificing any of the flaky, buttery goodness. These hand pies are wonderful for breakfast, dessert, or tucked into lunch bags as a special treat.

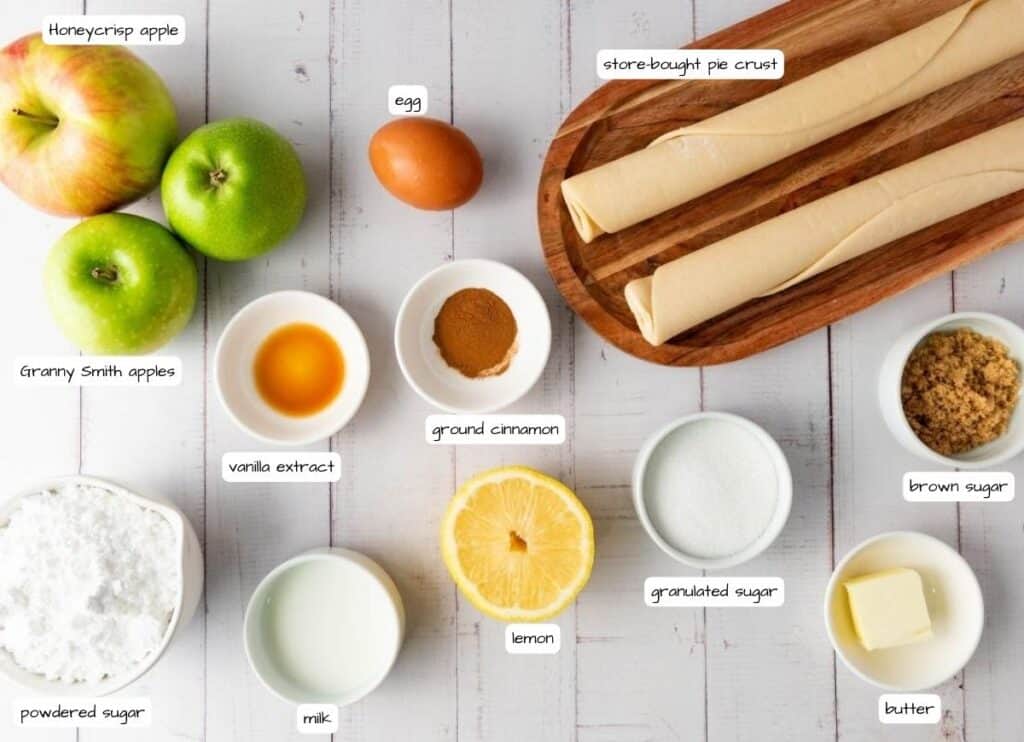
Ingredients
For the Filling:
- Granny Smith apples – If you have extra filling, use it to top some ice cream. Yum! Dice the apples in about ⅓-inch dice.
- Honeycrisp apple – Dice the apples about the same size so they cook evenly.
- Granulated sugar
- Brown sugar – You don’t need to pack the sugar unless you like it extra sweet.
- Ground cinnamon – Fresh spices make all the difference!
- Lemon juice
- Butter
For the Assembly:
- Store-bought pie crust – Thawed if frozen.
- Egg – It doesn’t matter if it’s a large or extra large egg. You’ll use this for the egg wash.
For the Glaze:
- Powdered sugar
- Milk
- Vanilla extract – You can use artificial vanilla extract in this recipe. It’s just fine.
How To Make Apple Hand Pies
Scroll down for the full recipe card with exact measurements and printable instructions.
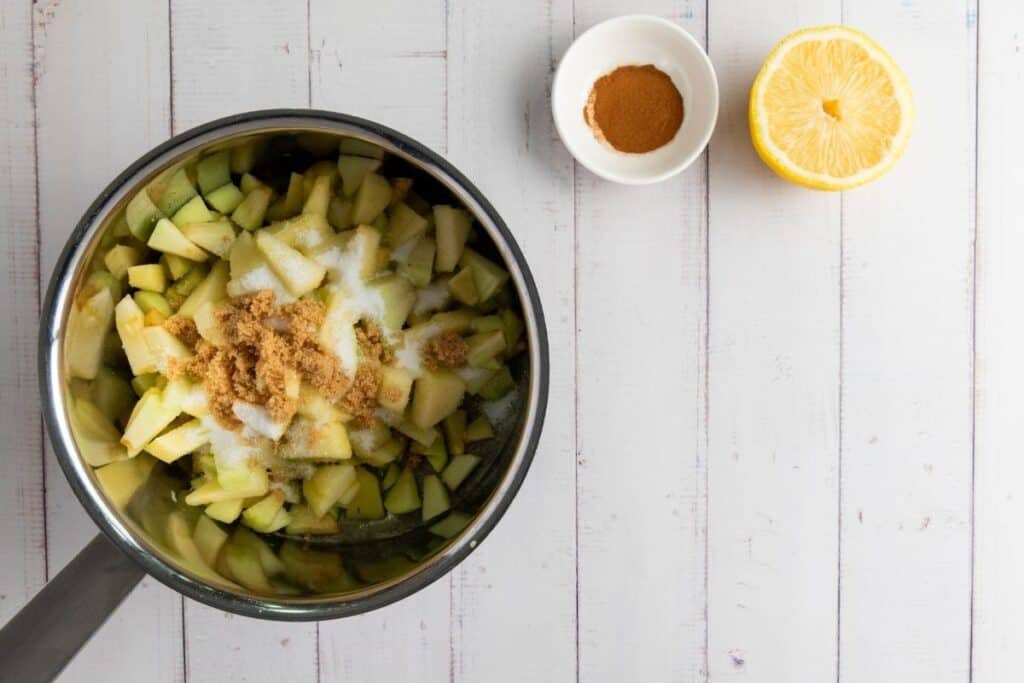
Place a medium saucepan on the stove over medium heat and melt the butter. Add the diced Granny Smith and Honeycrisp apples, granulated sugar, brown sugar, cinnamon, and lemon juice. Stir everything together with a wooden spoon and cook for about 5 to 7 minutes, stirring occasionally, until the apples have softened slightly but still hold their shape. Remove the pan from the heat and let the filling cool to room temperature while you prepare the pastry.


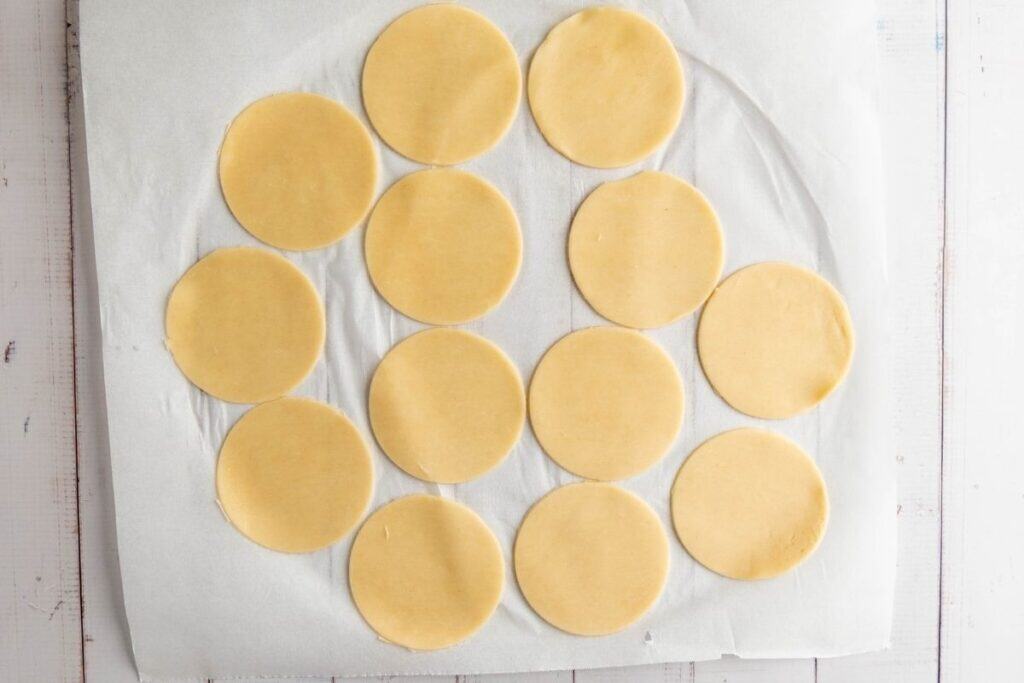
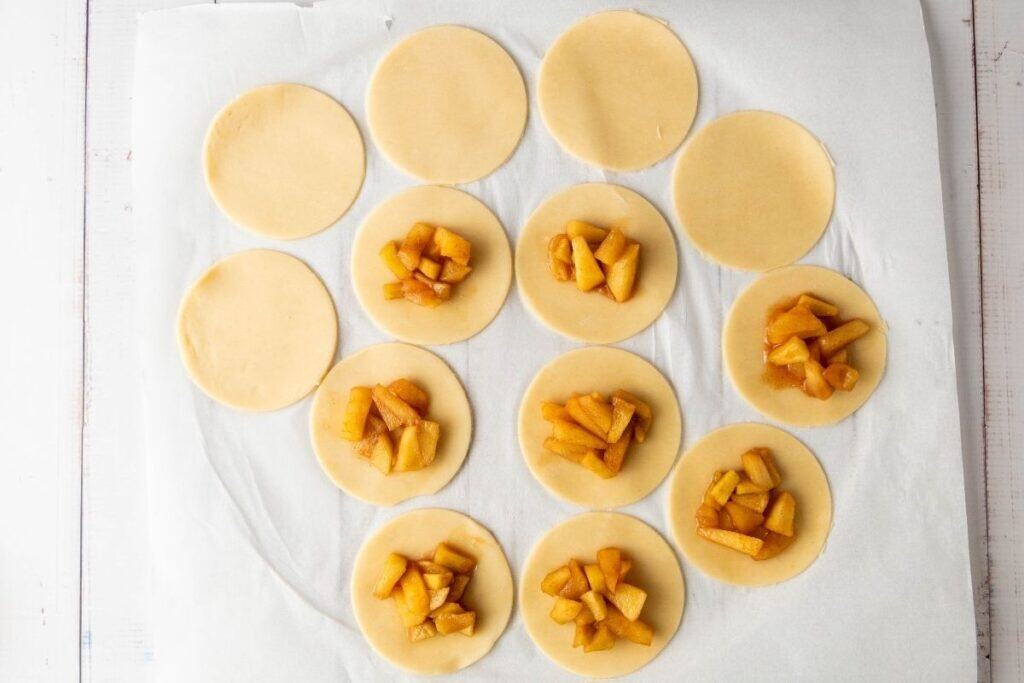
Preheat your oven to 400°F (200°C) and line a baking sheet with parchment paper. Unroll the store-bought pie crust sheets on a clean, lightly floured work surface. Use a round cookie cutter (about 2 inches in diameter) or the rim of a large glass to cut circles from the dough. You should get about 12 circles from each sheet, for a total of 24.


Place a spoonful of the cooled apple filling in the center of one dough circle; don’t overfill or it will leak out during baking. Top with a second dough circle and gently press down around the edges to seal the two layers together. Use a fork to crimp and seal the edges completely, pressing firmly to create a decorative pattern.

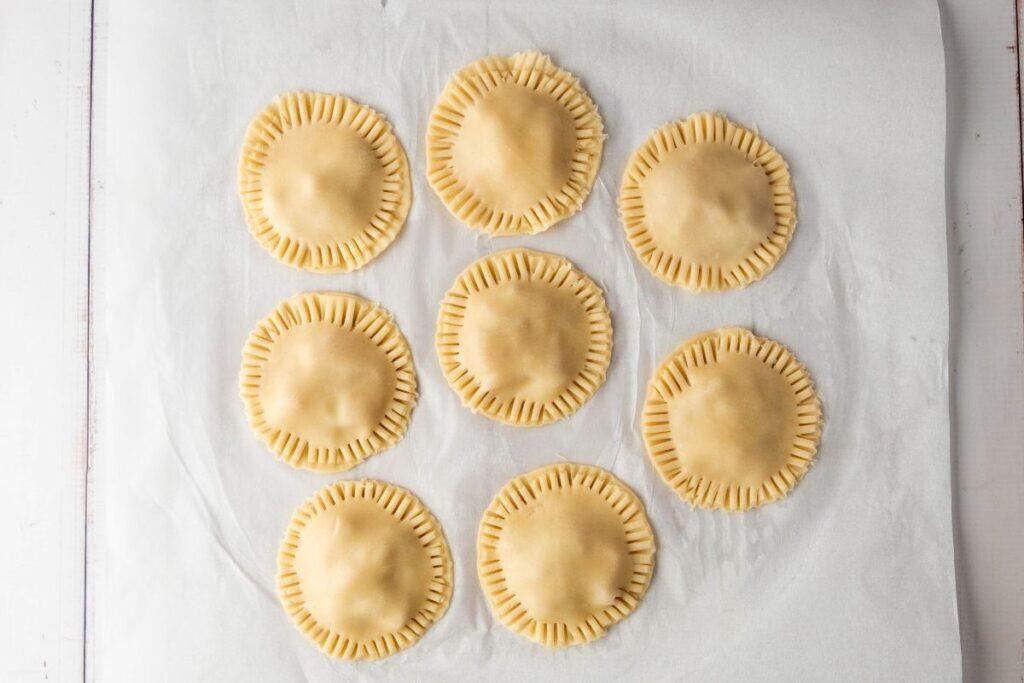
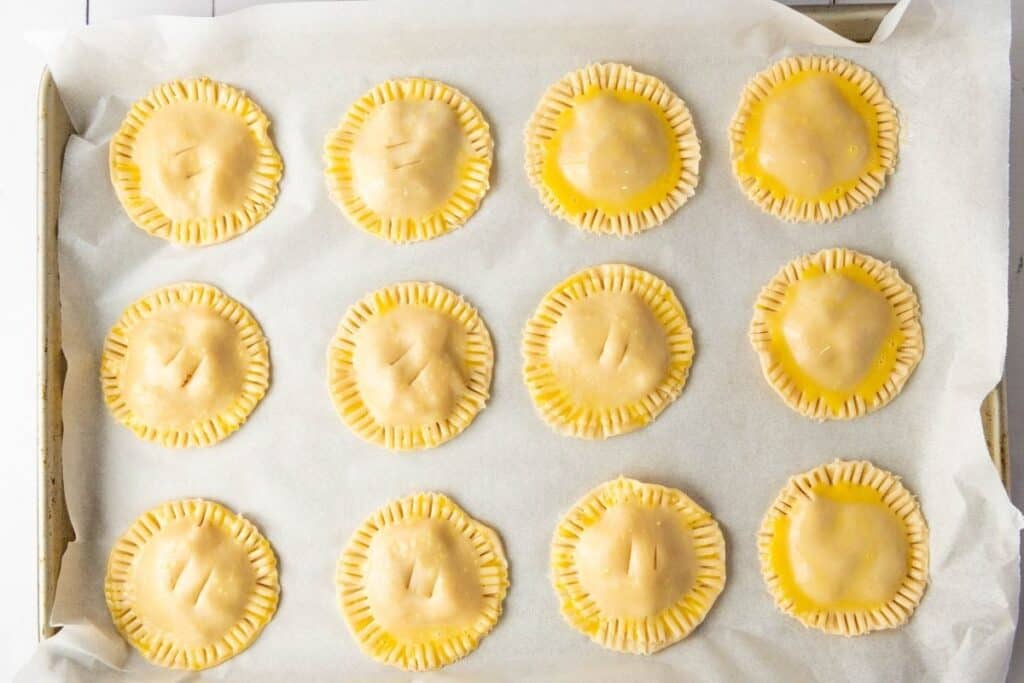
Brush the top of each hand pie with the beaten egg using a pastry brush; this gives them that gorgeous golden color when baked. Use a small knife to cut two small slits in the top of each pie to allow steam to escape during baking.


Arrange the assembled hand pies on your prepared baking sheet, leaving a little space between each one. Place the sheet on the center rack of your preheated oven and bake for 20 to 25 minutes, or until the pastry is golden brown and flaky. Remove from the oven and let the pies cool on the baking sheet for about 10 minutes.
While the pies cool, make the glaze. In a small bowl, whisk together the powdered sugar, 1 tablespoon of milk, and vanilla extract until smooth. If the glaze is too thick, add the remaining tablespoon of milk a little at a time until it reaches a drizzling consistency.


Once the hand pies have cooled slightly, drizzle the glaze over the tops using a spoon or transfer it to a piping bag for more control. Let the glaze set for a few minutes before serving.

Serving Suggestions
Apple Hand Pies are delicious served warm or at room temperature. They’re perfect for breakfast with coffee, as an afternoon snack with tea, or as a portable dessert for picnics and potlucks. For an extra-special treat, serve them warm with a scoop of vanilla ice cream or a dollop of whipped cream. They also make wonderful homemade gifts; wrap them in cellophane bags tied with ribbon for a thoughtful gesture.

Storage Tips
Store cooled Apple Hand Pies in an airtight container at room temperature for up to 2 days, or in the refrigerator for up to 5 days. To freeze, place the cooled pies (without glaze) in a single layer on a baking sheet until frozen solid, then transfer to a freezer-safe bag or container for up to 3 months. Reheat frozen pies in a 350°F oven for 10 to 15 minutes, then add the glaze after reheating. The glaze may soften in storage, so you can always add fresh glaze before serving.

Apple Hand Pies Recipe
Equipment
- cookie-cutter (2 inches in diameter)
Ingredients
For the Filling:
- 2 smaller Granny Smith apples peeled, cored, and diced
- 1 Honeycrisp apple peeled, cored, and diced
- 3 tablespoons granulated sugar
- 1 tablespoon brown sugar
- 1 teaspoon ground cinnamon
- 1 tablespoon lemon juice
- 1 tablespoon butter
For the Assembly:
- 2 sheets of store-bought pie crust
- 1 egg beaten (for egg wash)
For the Glaze:
- 1 cup powdered sugar
- 1-2 tablespoons milk
- ¼ teaspoon vanilla extract
Instructions
Prepare the Apple Filling:
- In a medium saucepan, melt the butter over medium heat. Add the diced Granny Smith and Honeycrisp apples, granulated sugar, brown sugar, cinnamon, and lemon juice.
- Cook for about 5-7 minutes, stirring occasionally, until the apples have softened slightly but still hold their shape.
- Remove from heat and let the filling cool to room temperature.
Assemble the Hand Pies:
- Preheat your oven to 400°F (200°C) and line a baking sheet with parchment paper.
- Roll out the store-bought pie crust on a lightly floured surface. Use a cookie cutter (2 inches in diameter) or the rim of a glass to cut out circles. You should get about 12 circles total from each sheet of dough.
- Place a spoonful of cooled apple filling in the center of one dough circle. Don’t overfill.
- Top with a second dough circle and gently press down around the edges to seal.
- Crimp the edges with a fork to fully seal the pie.
- Brush the tops with beaten egg using a pastry brush for a golden finish.
- Use a small knife to cut two small slits on top of each pie to allow steam to escape.
Bake the Pies:
- Place the assembled hand pies on the prepared baking sheet and bake for 20-25 minutes, or until golden brown.
- Remove from oven and let cool for about 10 minutes.
- Prepare the Glaze:
- In a small bowl, whisk together powdered sugar, 1 tablespoon milk, and vanilla extract until smooth. Add more milk if needed for the desired consistency.
- Drizzle the glaze over the cooled hand pies and allow it to set for a few minutes before serving.
