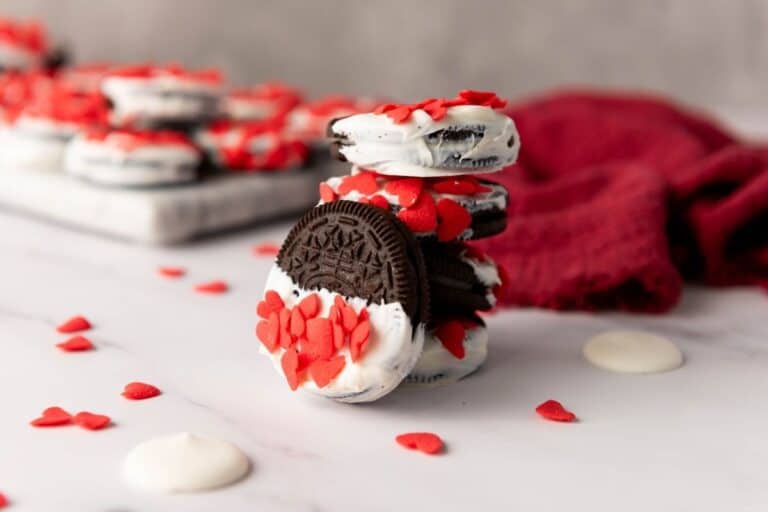
Halloween Oreo Treats
When October rolls around, my kitchen turns into a candy-coated, sprinkle-dusted workshop, and I absolutely love it. These Halloween Oreo Treats are festive, fun, and fast to make, which means you can whip them up with the kids, bring them to a party, or stash a few for yourself without breaking a sweat. If you’ve ever stared down a last-minute bake sale or forgotten to prep for the classroom party, this recipe is your new best friend.

This post may contain affiliate link(s). As an Amazon Associate, I earn from qualifying purchases. See Disclosure.
These are my kind of treats: no oven, no stress, just candy melts, sprinkles, and those classic Oreo cookies dressed up in their Halloween best. Trust me, once you make a batch, you’ll see just how easy and addictive they are.

Ingredients:
- Oreo cookies – You can use Oreo or store brand cookies. They work equally well
- Purple candy melts – You can find candy melts online or at your local craft store in the cake decorating section.
- Green candy melts
- Orange candy melts
- Halloween sprinkles – Like bats, pumpkins, ghosts, or other spooky shapes.

How To Make Halloween Oreo Treats
Scroll down for the full recipe card with exact measurements and printable instructions.
Line a large rimmed baking sheet with parchment paper or a silicone baking mat. I always use a rimmed sheet so nothing slides off while I’m working or transferring the tray. A silicone mat is my go-to for projects like this because it grips the cookies and peels off clean without damaging the candy coating.
Separate your Halloween sprinkles into a few small prep bowls. I like using clear glass pinch bowls so I can easily see what I’m reaching for and let kids pick their favorites.
Place the candy melts into three microwave-safe glass bowls. Glass bowls are ideal for melting candy because they heat evenly and hold warmth longer than plastic. That gives you more time to dip without the coating thickening too fast.
Microwave one bowl at a time in 30-second bursts. Stir after each interval using a heatproof silicone spatula. A silicone spatula is perfect for this; it scrapes the bowl clean, doesn’t warp under heat, and helps the melts stay silky smooth.

Dip each Oreo into the melted candy using a candy dipping tool or a two-prong fork. I prefer a dipping tool with a flat base that cradles the cookie and lets the excess drip right off. It gives a cleaner finish and keeps my fingers out of the candy.
Tap the tool gently on the side of the bowl to let any extra coating drip off. Place the coated cookie onto the lined baking sheet. I set my sheet over a cooling rack to help air circulate underneath. That little airflow helps the bottoms firm up without sticking or getting soggy.

Repeat with 4 Oreos per color to make a mix of purple, green, and orange. I like to work in batches so the candy melts stay warm and manageable. If one bowl starts to cool too much, I pop it back in the microwave for 10 seconds.
Sprinkle the Halloween decorations over each cookie while the coating is still tacky. For precise placement, I use mini offset tongs or a tiny spoon to drop shapes exactly where I want them. This is especially helpful for themed cookies or when I want a more polished look.

Decorate each cookie your way; there’s no right or wrong here. This is a great time to let kids get creative with different designs. Just make sure to work quickly so the candy doesn’t harden before the sprinkles are on.
Let the candy coating set at room temperature for about 30 minutes. If I’m in a rush, I slide the tray into the fridge for 15 minutes. I use a fridge-safe tray lid or even a large inverted baking sheet on top to protect the treats from fridge moisture and odors.
Transfer the finished Oreos to a serving tray or airtight container. I love using a simple tiered tray lined with wax paper for display; it looks great and makes serving easy. If you’re storing them, stack with a layer of parchment between to keep the coatings from smudging.

Chef Jenn’s Tips
- Use a candy dipping tool or fork to lift Oreos cleanly from the melted coating without making a mess.
- Glass bowls help candy melts heat more evenly and stay warm longer.
- If your candy coating gets too thick, stir in a tiny bit of coconut oil to smooth it out.
- Let kids pick their own sprinkle combinations, it’s a great hands-on project for Halloween parties.
- For gifting, wrap the Oreos in cellophane treat bags tied with ribbon or twine.
Recommendation


Make It A Meal
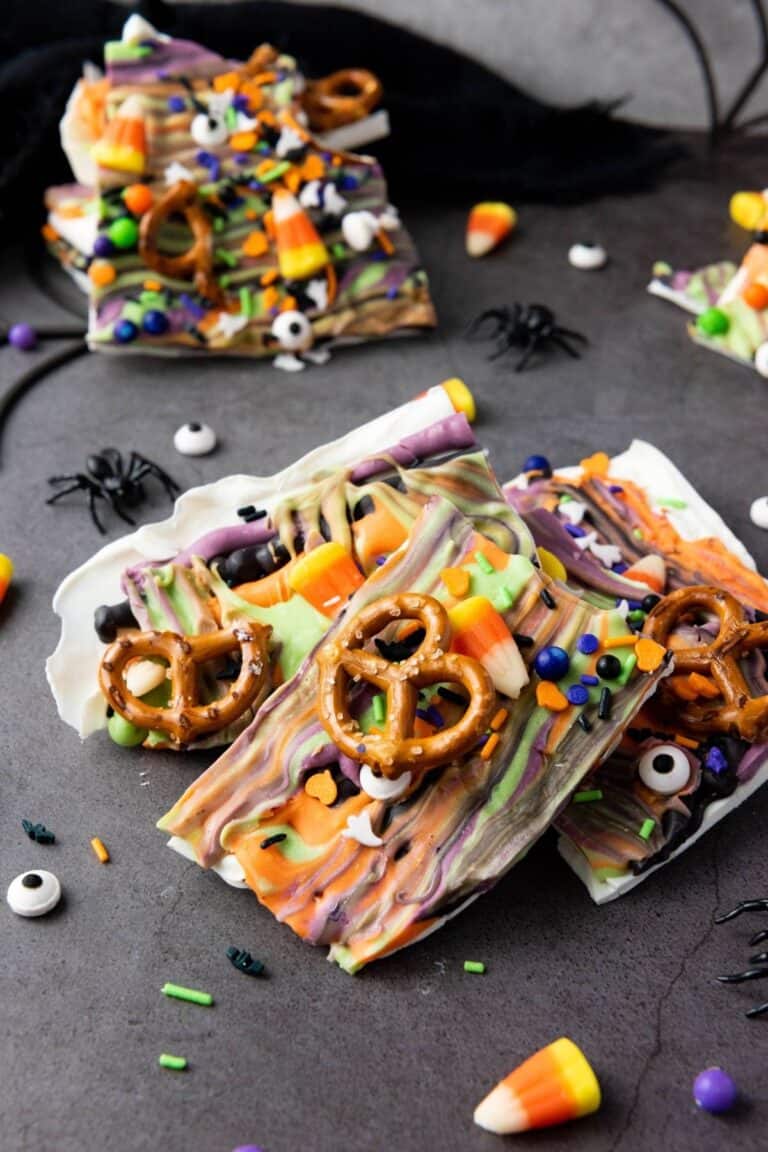
These treats are perfect on their own, but they’re even better when served on a Halloween dessert tray. Pair them with chocolate-dipped pretzels, popcorn balls, or candy corn bark for a no-bake spread that’s as easy to prep as it is fun to eat. They also work well tucked into lunchboxes or handed out at school events.

Storage
Store Halloween Oreo Treats in an airtight container at room temperature for up to 5 days. Keep them away from heat and humidity to prevent the candy coating from melting. For longer storage, freeze the decorated Oreos in a single layer between sheets of parchment paper in a freezer-safe container. Thaw at room temperature before serving.

Halloween Oreo Treats
Equipment
Ingredients
- 12 Oreo cookies
- ¼ cup purple candy melts
- ¼ cup green candy melts
- ¼ cup orange candy melts
- Halloween sprinkles
Instructions
- Line a baking sheet with parchment paper or a silicone baking mat and set aside.
- Separate the Halloween sprinkles into small bowls for easy access.
- Place the purple, green, and orange candy melts in three separate microwave-safe bowls.
- Microwave one bowl at a time in 30-second intervals, stirring after each interval, until the candy melts are smooth and fully melted.
- Dip each Oreo cookie into the melted candy using a fork or dipping tool.
- Let the excess candy drip off, then place the coated Oreo onto the prepared baking sheet.
- Repeat with 4 Oreos per color to create a colorful variety.
- Sprinkle the Halloween decorations over each cookie while the coating is still wet.
- Get creative and decorate each cookie with different combinations of sprinkles for a fun and festive look.
- Let the candy coating set at room temperature for 30 minutes to an hour. If you’re in a hurry, place the tray in the refrigerator for about 15 minutes.
- Serve the Oreo treats on a festive platter or store them in an airtight container until ready to enjoy.
Notes
Chef Jenn’s Tips
- Use a candy dipping tool or fork to lift Oreos cleanly from the melted coating without making a mess.
- Glass bowls help candy melts heat more evenly and stay warm longer.
- If your candy coating gets too thick, stir in a tiny bit of coconut oil to smooth it out.
- Let kids pick their own sprinkle combinations; it’s a great hands-on project for Halloween parties.
- For gifting, wrap the Oreos in cellophane treat bags tied with ribbon or twine.